How to take screenshots (Windows)
In Windows, there is the Snipping Tool. It looks like this:

1. Click the Start button in the bottom left corner
2. Type snipping tool in the search box
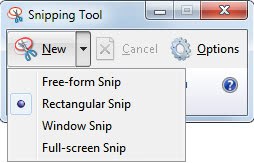
3. Select Snipping Tool from the list of results. You will get this:
Windows 10:

Windows 7:

The default mode is Rectangular Snip, although you can change the mode to:
-
Free-form snip. Draw a free-form shape around an object.
-
Rectangular snip. Drag the cursor around an object to form a rectangle.
-
Window snip. Select a window, such as a browser window or dialog box, that you want to capture.
-
Full-screen snip. Capture the entire screen.
4. For the Rectangular Snip, click New. The screen should become lighter.
5. Click and drag to create your box. Once you release your pointer, a separate screen should come up that includes your photo.
6. From here, you can save it, annotate it, or create a new screenshot.

Annotating is helpful for the person you are sending the screenshot to understand what they should be looking at.
You can also open up Paint and annotate the photo better using arrows and text.
More information is also available at Microsoft Support.